.jpg)
Instructions
First time joining us here at E-Riders? Seen a class on our schedules page you fancy having a go at? Follow this handy guide to get started - you'll be up and running in no time!
1. Register and login to your account
You'll need to register before you can enter any classes. Registration is quick, simple and free!
Please note that if you were a previous E-Riders member, you will still need to register on the new site. You'll be able to add the previous ID's from the old site to the new one to keep track of all your results.
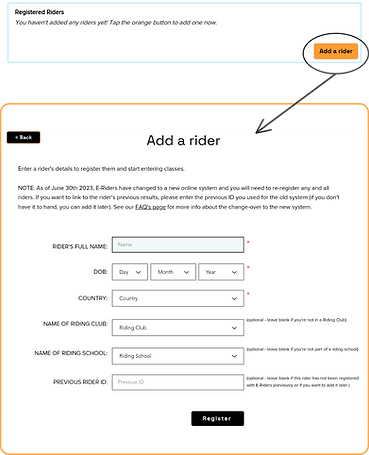
2. Add riders and horses to your profile
Simply go to the My Account page, scroll down to the "Registered Riders" box and tap "Add Rider". Fill in the form and tap register when you're done. If the rider you're registering has previously been registered on the old E-Riders website, you can enter their ID to link their previous results to this new site. If you're a completely new user, just leave that field blank! You can add as many riders as you like to your account.
Do the same for your horses in the "Registered Horses" box. Again, you can add link horses previously registered with the old site with the new system by entering their previous ID. You can add as many horses as you like to your account.

3. Find the class you'd like to enter
Checkout our schedules page or skip straight to the entries page to see the available classes. You'll first need to choose the arena. We have lots of different arenas, which all count towards different leagues. For more info about the different arenas, click here.

Once you've selected your arena (in this example we'll choose the Main arena, which uses the E-Riders tests), you'll next need to select your level.

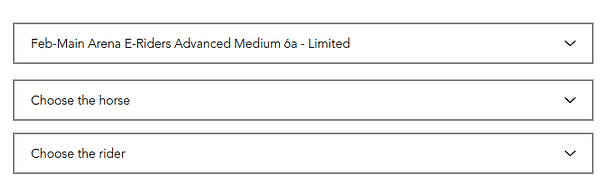
Next choose the test from the dropdown list (the available tests will change each month) and the section you're eligible for (check the rules here for more info about eligibility) and then tap Add to basket. You can add multiple classes (and we hope you will!) to your basket. When you're ready, just checkout in the normal way.
You don't need to specify which horse and rider you're going to do the class with when you enter - just add that class to your basket and checkout!

Now in the Entries section of the My Account page, you should see the class(es) you've just entered.

3. Film your test
Now for the fun bit - go ride your test! Be sure to read our rules and the instructions for filming your test before you get going to avoid any problems.
4. Submit your video
Once you've filmed your test, you can submit the video for that particular class. Navigate to the Upload page either from the main menu, or from the My Account page.
Once there, select the class you're submitting the video for along with the horse and the rider in the video (be sure to register the horse and rider before hand, else you won't be able to submit your video). We are only accepting videos uploaded via YouTube or Vimeo. See our guide for how to upload safely and securely to YouTube here.

Once you've selected your class, you'll see dropdown menus for the horse and rider. If you've entered a class in one of the Riding School or Riding Club leagues, you'll also see and option for your club or school.
Now you can add in the url (that's the link to the video on YouTube or Vimeo) and hit the orange submit button.

Now when you see your entries on the My Account page, you'll see a ✓ next to the entry you just uploaded a video for.

Note that the videos go straight to the judges and you cannot change your video once it's been judged. So be sure you're happy with your video before uploading!
If you want to check you've selected the right video, if you tap on that entry from your "My Account" page, you'll see an option to see your video. If you *HAVE* made a mistake, you can delete the video if the judge hasn't already started marking it. Just tap on the "delete video" button bottom right.

We also understand that nothing is ever straight forward with horses, so we've given you a "withdraw" option. This button will allow you to withdraw from the selected class, deleting your entry. Instead, you'll be granted a credit entry (see below), which you can use on any class of your choosing for the next month. However, if you've added a video and the judge has already judge the test, you will not be able to withdraw.

Tap on the "use my credits" button to go to the Free Entry Page. Scroll through the class list and tap "enter" on the one you want to enter. And that's it - you're all entered for your next class. You'll then upload your video in the same way as a regular entry you made through the shop.

E-Riders Loyalty Card
Each time you enter one of our monthly classes, you'll get a stamp on your loyalty card (which can be found on the My Account page). When you've collected 10 stamps, you get a free entry in the form of an entry credit. You can see how many entry credits you have below the loyalty card.
If you have 1 or more entry credits, now when you go to the entries page, you'll see a message like this one asking if you want to use your credit.

Highest Placed Awards
About the awards...
To enter, you'll follow similar steps to entering a regular task, just without having to upload any videos.
On the Entry page, find the "Highest Placed Awards" category. There will only be 1 class available in the product gallery for any particular month.

When you're in the Checkout process, you'll see that there are a list of sections to choose from. Click which section you'd like to enter. Note that you can enter multiple sections, i.e. 2. Barefoot and 4. Cobs Can, but you will need to pay separately for each entry (and be sure to select the right section!)

Now you'll see your Highest Places Awards in your January Entries section on your My Account page.

To complete your entry, you will need to select the horse and the rider who's results you want to put forward for the award. Either tap on the entry or go to the Highest Placed Entry option from the main menu bar


Select your entry (sections will be shown in the menu) and then the horse and rider

Now you'll see the full entry on your My Account. And that's it until the results are published, where the Highest Placed awards will be available just like any other class.

5. Results and Score Sheets
Once the class is complete and the results have been published, you can find them on the main Results page. This page lists all the E-Riders classes, so it might be quicker to use the filter selection boxes to find the exact class you're after! Simply click on the class row in the table to see the results.

You'll see the results table with everyone's scores, the League Points and the E-Rider points they earned. You'll see an extra link "see score sheet" after any entries from one of the riders you entered. Click this link to see your score sheet.

Below is an example of a score sheet as viewed on a laptop or PC. (Note normally the orange box will have a banner with the class sponsor). If you're viewing your results on a phone, be sure to tap the orange "See mobile friendly version" otherwise it'll be an awful experience trying to read your sheet!!!

To make things quicker, you can also go on the "My Results" page to see a full list of all your results and links to the score sheets.
